Prologue: I started writing the below post about a year ago but in the end I never really found a solution to the problem and consequently I never finished the post. Sometime it's best to know when to quit, but maybe this project can be of use to you anyway. Or maybe you'll find the solution that I didn't... well if you do please let me know.
Look Ma no wires!
Ok, so I've built an Arduino based Mood Light Controller and I've managed to get my Arduino to send integers over RF with VirtualWire. Finally I've also built my first Arduino Standalone ATmega / Arduino Bare.
Now I've combined the three into one Wireless Arduino Mood Light Controller. To be honest I had two very different projects planned for my Standalone ATmega and the RF part but those sort of became obsolete in my current living situation.
When I first merged the RGB Mood Light code with the RF Receiver code my Arduino kept hanging. Confident in my own coding skills I quickly aimed my blame towards those who write librarys for the Arduino IDE. The good folks in the Arduino forum managed to deflate my swelling ego and pointed out a few flaws in my code before coming to the conclusion that it might be a hardware problem.
"The rise and fall of a ego" is available as a thread in the Arduino forum.
Meanwhile back on earth ...
I moved my question to the General Electronics part of the Arduino forum, this time with a little more humble attitude. After following the instructions of Grumpy_Mike I quickly learned that my problems came from interference caused by using PWM to control the RGB LED. The trick was to swap out the resistors to 1K Ohm resistors in order to minimize the current and the interference it caused. With 1K Ohm resistors everything worked flawless, well except for the LED that got quite dim.
To minimize the interference Grumpy_Mike suggested the use of capacitors and/or ferrite beads. This actually helped a bit but still not good enough.
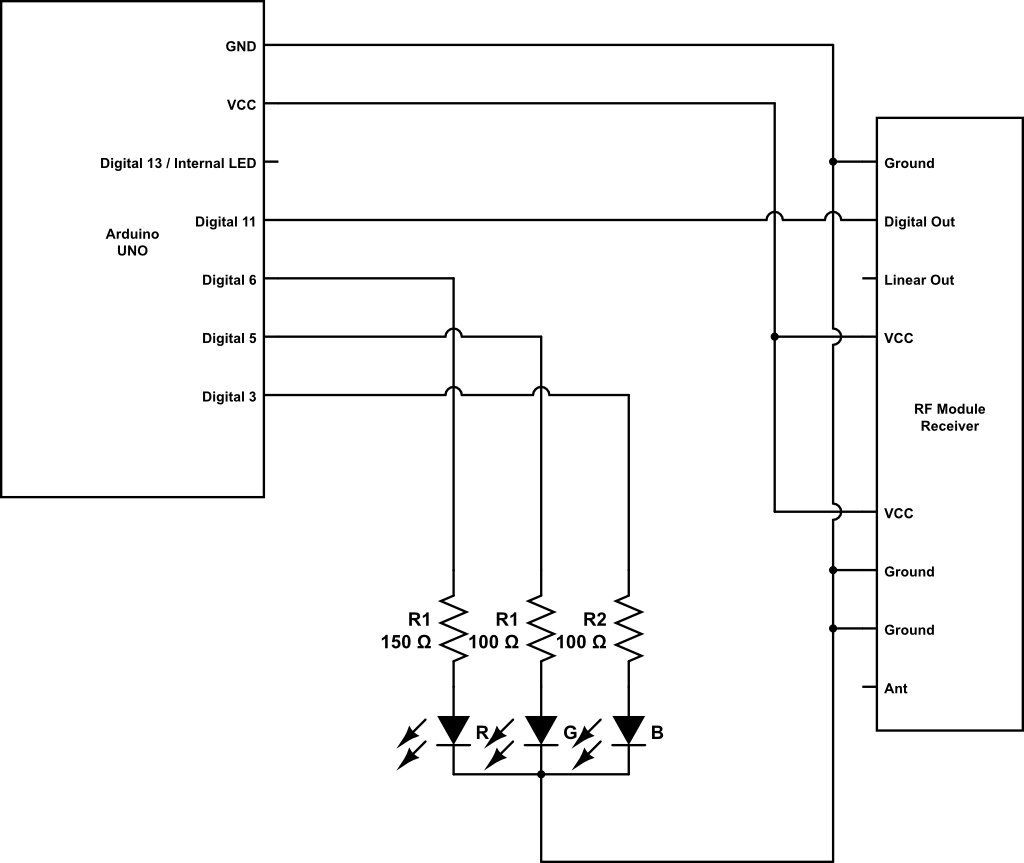
Improved circuit with capacitors to stop interference caused by PWM.
Above circuit breadboarded on a protoshield.
Kind of messy and lot's of wires that can cause interference.
Apparently the problem with a circuit like this is that every lead and wire is a source of interference.So I was advised to try to make the circuit tidier, shorten leads and hope for the best.
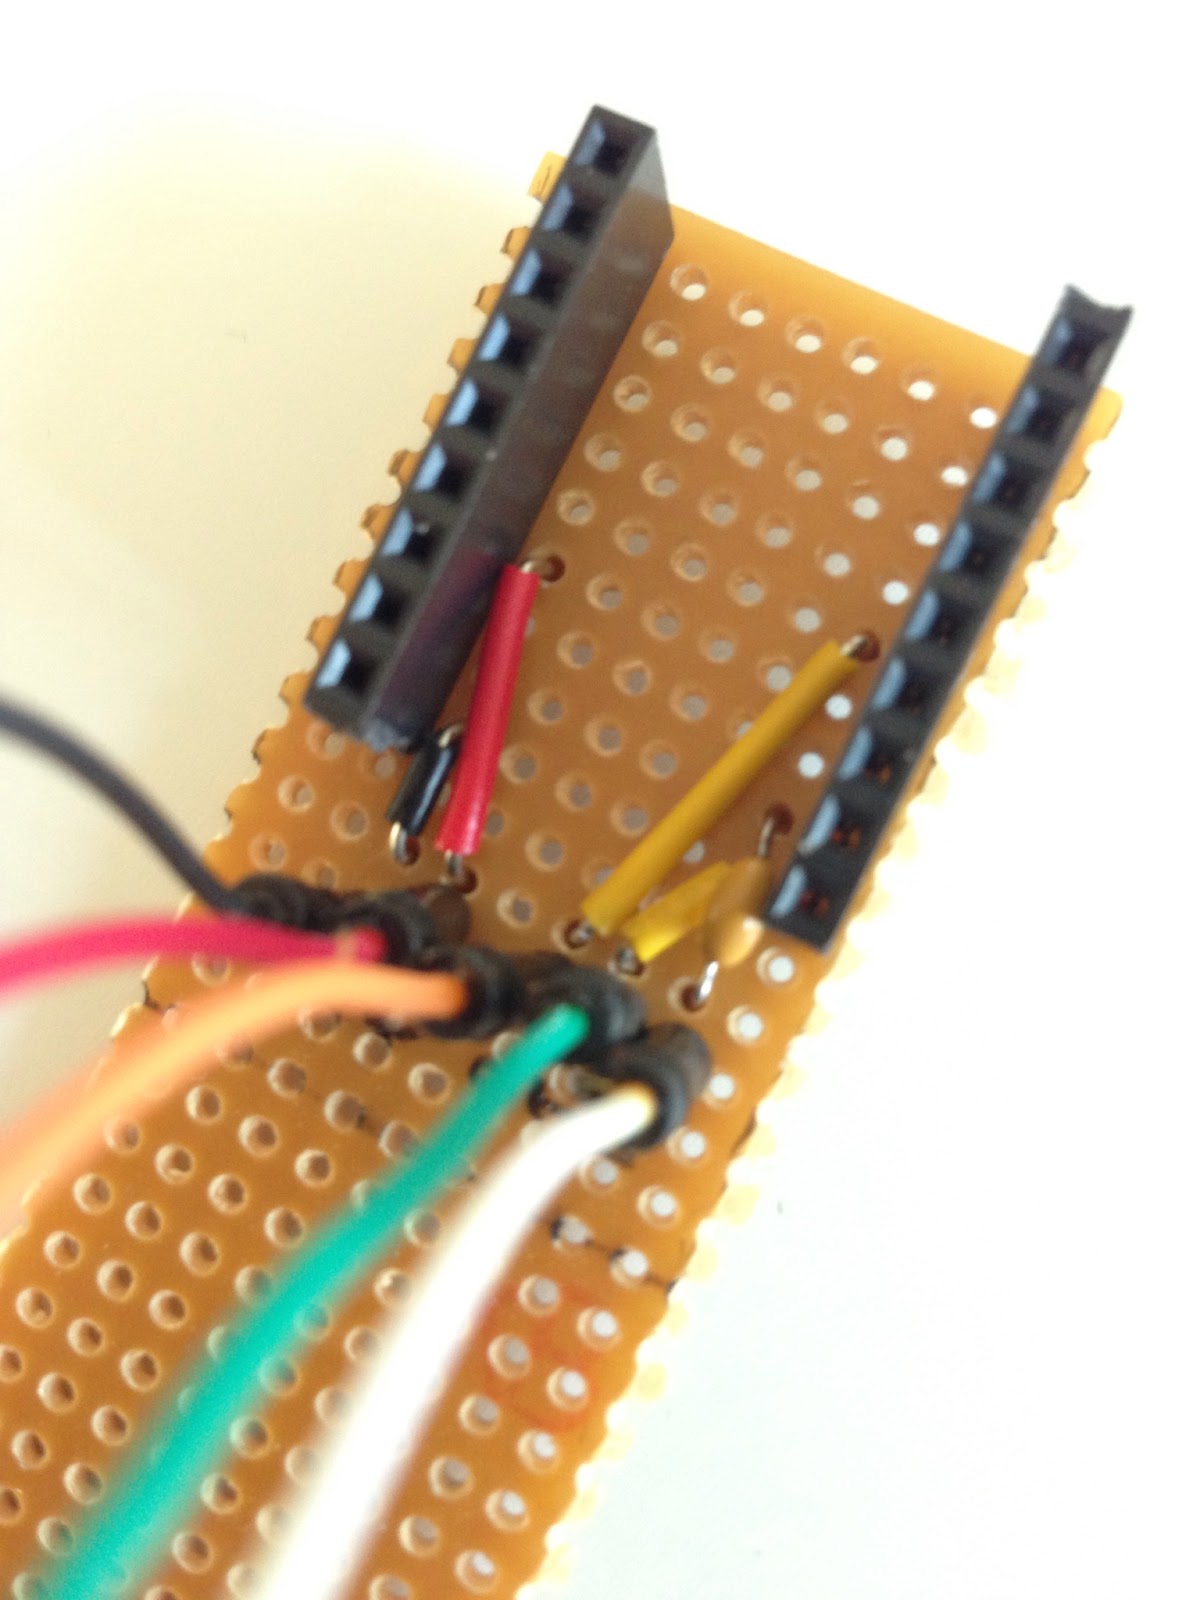
Leads of the LED and resistors trimmed down ...
... and the RF receiver connected via a ferrite bead as well as an added physically distance.
Also the power supplied to the RF receiver is decoupled with a capacitor.
Dead end?
Unfortunately all this helped very little... and I'm sort of stuck. If you do find a solution to this please let me know as I would love to finish this project.
I recently read about Cupt a rewritten apt-get replacement that apparently would be more suitable for low end machines. Well it's not specifically written for low end machines, I guess it's just less resource demanding.
Anyway I decided to try upgrading my old Toshiba 320CDS from Debian Squeeze to Wheezy using cupt. Upgrading in Cupt comes in a couple of different flavors. I decided to go with the one I know best: sudo cupt update sudo cupt dist-upgrade
Actually all things went fairly smooth apart from conky breaking the upgrade halfway through. I resolved this minor issue by just removing conky (sudo cupt remove conky) when the upgrade broke and then just start the upgrade from scratch (or whatever state my system was left in).
When the upgrade was done, everything seemed to be ok, but at reboot I was dropped to busybox...(sigh) as usual. This happens because I have to used the ide-generic kernel module to boot from my ide disks.
I typed in: modprobe ide-generic
But my system said that no module with that name was available... (this is where I panicked and retyped that about twenty times trying different combinations of ide, -,_ and generic). Naturally that didn't accomplish anything so I googled a bit and found that ide-generic had been removed from the kernel packages and been replaced by pata_legacy.ko
So instead I tried: modprobe pata-legacy
The module loaded and my drives were recognized. I hit CTRL-D and the boot resumed.
As soon as my system was up and running I replaced ide-generic with pata-legacy in /etc/initramfs-tools/modules
and issued: sudo update-initramfs -u
...and rebooted without a hitch. Well actually, first I replaced it with pata-generic, which of course is very wrong and got dropped to busybox again. But I will never admit to that. ;)
Also I must say that cupt feels a tad bit snappier than apt-get.
Today (yesterday) I got an email from the author of CAMP who had found my efforts on getting his old software to work on newer systems. Much to my delight he also offered to do the updates required to get CAMP to work or rather play nice with modern compilers.
12 V DC computer fan with grill, filter and a 2.1 mm DC connector.
Make's Candy tin fume extractor had me pestering friends and coworkers for 40 mm x 40 mm fans for a long time until I finally googled up this picture instead. A bare bones solder fume extractor that I find a lot more appealing than the candy tin version. Even better it delivers more "suck" and I already had a suitable fan.
I might paint it somewhere in the future. I think matte white would look
pretty cool in contrast to the black fan, filter an cable.
Filter side, yes it's missing one set of nut/bolt/washers.
My idea about using the already rounded corner of the filter
to my advantage turned out as a disadvantage.
Well maybe not as much new life. Let's call it an iBook G4 on dialysis, anyway the main objective was to erase and reinstall OSX 10.5 Leopard on my 12" iBook G4 1,33 GHz . Unfortunately my original DVD was "lost" so I had to go and find another solution.
Failure 1 - Burned image on DVD
I did try to burn a new DVD using an image of the original but that didn't pan out very well as the installation process got stuck in the verification phase. I did try to skip the verification process but that just left me with a totally unusuable system.
Failure 2 - External USB DVD
I moved on to trying to boot from an external USB DVD reader/writer using instructions I found at Ben Collins blog. But for some reason my external USB DVD reader/writer just wouldn't show up in Open Firmware.
Success - Image on USB stick
When I was busy googling for options to get my external DVD functioning I briefly read something about USB sticks being friendlier in this scenario than a USB drive of some sort. So I used OSX's "Disk Utility" to write the aformentioned ISO image to a USB stick and went back to step 1 of Ben Collins instructions and success showed its pretty little face at step 4 i.e typing boot ud:,\\:tbxi in open firmware. From there on everything worked flawlessly. To get to open firmware press and hold Command+Option+O+F as soon as you power up your iBook.
Apps?
The only problem was that many of the apps I had installed on my iBook now only supports Intel architecture. But I quickly realized I'm not alone! I found the Power PC Software Archive a great collection with the latest release of many PPC apps on local mirrors. This means I that I once again can run Spotify on my iBook G4. Also I found the Mac PowerPC blog, and the great great great app MacTubes. Normally YouTube is out of the question on the old iBook, ok so I might get it to start but viewing pleasure is out of the question. MacTubes changes all that, now I can search, browse and play videos to my hearts desire with out any lag or out of sync audio what so ever.
Forget everything I wrote in my previous post. Like Andrew pointed out in the comments on my youtube video and the blog, running a cron job every minute isn't really optimal. There is a better way to do it.
The fun part is that it doesn't require autofs since it uses udev rules and can find out the id of a USB stick (or any other device I guess) upon connection instead of going through the mounting process. At the same time it also manages quite nicely renders my script obsolete since you can issue "shutdown -h now" directly. Oh, did mention it's A LOT faster.
Well enough with the talk here's how you do it:
Find out the vendorId and productId of your USB stick:
$ lsusb
Here's my output, the numbers you want are the ones after "ID" the first one is the vendorId and the latter productId:
Bus 001 Device 003: ID 0781:7114 SanDisk Corp. Cruzer Mini
Bus 001 Device 001: ID 1d6b:0001 Linux Foundation 1.1 root hub
Then create an aptly named file in: /etc/udev/rules.d/ I went with: 100-usb-device-action.rules
Then add the following line, just substitute your vendorId and your productId
This post is sort obsolete since there is another way to shutdown linux nicely that requires less of everything. You can read about it here. However maybe you came for the script that looks for a file and issues a command. Well then you're in the right place, just scroll down a bit.
Shutdown Linux nicely with a USB stick
If I had such a thing like a following from regular readers you would probably know about my ancient Toshiba Satellite 320CDS laptop that now serves as a digital picture frame. The only problem is to have it shut down properly.
Why is that a problem you ask?
Well, I can't use the power button as it just cuts the power and I risk getting disk errors that most likely forces me to hook up a keyboard on the next boot. Something that I rather avoid.
But I can do it via a ssh connection. However that requires a working network connection and another device. That leaves me with the option I'd rather avoid. Connecting a keyboard and manually shutting the system down. Ok, not the end of the world but it's a bit tedious to have to drag out a keyboard each time I want to do a shut down.
My solution for this is a script that checks if a certain file is present in a defined directory. If the file is present the script issues the "shutdown -h now" command. The physical part of this is that the file is contained on a USB stick that when inserted automounts to a certain location. By running the script from root's crontab I now have a way to make Linux shut down nicely without a working network connection or keyboard.
Howto: Shutdown Linux nicely with a USB stick
So what is needed for this to work? Well first of all here's my script. It's not very complicated and you should be able to tailor it according to your needs. Perhaps you want to run a slideshow with the pictures on a USB stick when inserted or maybe even completely wipe your system.
The next step is to make a USB stick automount in a certain directory.
For this we need to install autofs. There's good tutorial on this here and here, but I'll give you the basics below.
Since I run debian installation is as easy as: $sudo apt-get install autofs
To configure autofs I started by adding this line to /etc/auto.master /media /etc/auto.removable --timeout=2
Then I added this line to /etc/auto.removable usb-shutdown -fstype=ext2UUID=UUIDOFYOURDEVICE
The UUID is the Universally unique identifier of a disk. In this case we use it as way to know what USB stick to mount in /media/usb-shutdown/
You can find out the UUID of your device with: $ls -la /dev/disk/by-uuid/
This will give you a list of your devices with symlinks pointing to their labels i.e /dev/sda1 etc. Alternatively you could run the following command, substituting /dev/sda1 to your device. $sudo blkid /dev/sda1
Finally to make autofs recognize your changes run: $ /etc/init.d/autofs restart
Last but not least we have to make the script run at a certain interval. This is done via the cron daemon. To edit root's crontab type following, if you want to edit the current user's crontab just omit the "sudo": $ sudo crontab -e
Add the following lines:
# Check if USB device with "systemHaltNow" is present * * * * * /PATH/yourscript.sh >/dev/null 2>&1
The stars tell cron to run the script once every minute forever and ever and ever. The last part stops cron from e-mailing you and logging everytime it executes the script, more info on that here.
Here's a little unfinished project that got trashed during my last relocation. Rather than playing around with LEDs and sensors this project is actually based on the idea to be both visually appealing and functional. The plan was to make a sort of interface to a media player such as iTunes or Spotify with the use of the Arduino and a proxy like Gobetwino or (the apparently now dead) ASproxy from (the equally dead) Tinker.it.
Since it's been on ice for quite some time, well actually in this case it rather got "iced" in the mafia sense of the word, I thought it was about time to share the concept of the project.
Step 1. Cut shapes of the buttons in a foam of choice.
Step 2. Glue some foil on the back of the buttons and scotch taped a wire
or solder if you're awesome at that.
Step 3. Paint the buttons in a nice color.
Yeah, I never really got around to step 3.
When I started out my intention was to make a simple circuit and a button that either breaks or closes a circuit. But then I started dabbling with capacitive sensing, hence just the one wire in the pictures.
Well like the title says shairport works quite nice with really old hardware and I do think 16 years qualifies as really old when it comes to computers.
Here's the specs: Toshiba Satellite 320CDS CPU: 233 Mhz Pentium MMX RAM: 96 MB HDD: SandDisk Compact Flash 8 GB Extreme IV via Lycom CF 2 IDE Bridge OS: Debian Gnu/Linux Squeeze
When streaming music from iTunes shairport uses about 38% CPU, quite a lot compared to mpg123 that only draws 10 % CPU. But really I'm just impressed that it works. When it comes to RAM shairport uses roughly 4 % of my available 95 MB.
The output of shairport isn't really that much fun
to look at so here's a screenshot of top instead.
I'm not going to tell you how to do it. That's pretty much covered here.
PLEASE NOTE: An official update of CAMP as of April 20 2013 is available here.
CAMP 1.5.3489 Console ANSI Mpeg3 Player (Rawlock skin).
Years ago I came across a really nice front end for mpg123 called CAMP by Sector7's inm. I fell in love with it at first sight. Why, well because I love ANSI art! So recently when I started drifting towards creating a console only GNU/Linux system I had this little gem in the back of my head.
CAMP File selector (Rawlock skin).
CAMP Description editor (Rawlock skin).
CAMP Forked to background.
I had to think hard (google) to actually remember the name of the app but luckily enough the website was (and is) still alive. Sadly the last update was in 2002. But hey! Maybe it didn't need more coding?
Or did it? Compilation gave me heaps of errors. Errors I first regarded as something way above my level of competence. Here's a few lines:
fork.c:120: error: too few arguments to function ‘exit’
fork.c: In function ‘stealback’: fork.c:137: warning: incompatible implicit declaration of built-in function ‘exit’ fork.c:137: error: too few arguments to function ‘exit’ fork.c:146: warning: incompatible implicit declaration of built-in function ‘exit’ fork.c:150: warning: incompatible implicit declaration of built-in function ‘exit’ fork.c:188: warning: incompatible implicit declaration of built-in function ‘exit’ fork.c:188: error: too few arguments to function ‘exit’
I started out by mailing the author but as of now I've still haven't heard from him or her. Then again I'm not really expecting someone to jump at troubleshooting their eleven year old code as soon as random idiot from the internet e-mails them about it. So I turned my questions to the mighty google instead.
I quickly learned that the errors were quite easily remedied: error: too few arguments to function ‘exit’
All the instances of exit() in fork.c needed to be replaced with exit(0).
warning: incompatible implicit declaration of built-in function ‘exit’
Add #include <stdlib.h> to the top of fork.c
After this the code will compile but still generates heaps of warnings. I've compiled a list of errors and remedies if you want a warning free compile, or you could just download my pre-fixed package further down.
How to download, make and install CAMP:
0 Install the dependencies $ sudo apt-get install zlib1g-dev mpg123 Note: First time I tried to compile CAMP on my Debian box I never had any issues with dependencies. Well except mpg123 since that is what CAMP is a front end for. If you do find any missing deps please comment and I'll add them to the list above.
1a. Get the latest code : $ wget -c http://sector7.nu/camp/camp-1.5.3589.tar.gz
PLEASE NOTE: An official update of CAMP as of April 20 2013 is now available. $ wget -c http://www.sector7.nu/camp/camp-1.6.3744.tgz
1b. Alternatively download my updated code that works for me. $ wget -c https://www.dropbox.com/s/510hdr4g3mutb5p/camp-1.5.3589_makkan.tar.gz
2. Unpack the downloaded file. $ tar xvzf camp-1.5.3589.tar.gz
3. Configure CAMP $ ./configure
4. Compile and install CAMP $ ./make && sudo make install
5. Install the skins $ ./make install-skins
Note: This installs the skins in ~/.camp/skins but for some reason the individual skin dirs are not executable i.e not possible to cd into. But it can easily be fixed by issuing: $ chmod ug+x *
in HOME/.camp/skins/
6. Configure CAMP, start by copying camp.ini from the source code directory to your home .camp/ dir $ cp camp.ini ~/.camp/camprc
Then edit the camprc according to your preferences e.g location of mpg123, audio output etc.
7. run CAMP! $ camp
Hey! Why does everything look like crap in Virtual console?
CAMP in console with $TERM Linux and locale sv_SE.ISO-8859-15
CAMP in console with $TERM Linux and locale sv_SE.UTF-8
Well I've found a way to temporarily remedy this. Although I'm still researching better solutions. The one I have right now is to use one of the following settings:
$ charset G0 cp437
$ charset G1 cp437
If for some reason your console turns out unreadable you can always go back with. Se more in the charset manpages.
$ charset G0 iso01 $ charset G1 iso01
CAMP in console with $TERM Linux, locale sv_SE.UTF-8
and charset cp437
Hey! Why does everything look like crap in PuTTY?
This one's easy. Just set the remote character set to the ISO-8859-X that suits you or type in CP850. It's under Window>Translation
Hey! Why does everything look like crap in PuTTY when I use GNU screen?
This one's easy. Just set the remote character set to the ISO-8859-X that suits you or type in CP850. It's under Window>Translation
And do the following:
set $LANG to C
$export LANG=C
In screen set c1 to off:
Press crtl+a+: and type c1 off
and set UTF8 to off:
Press crtl+a+: and type utf8 off off
Found these GNU Screen tricks in the amnesia/epic documentation here.
Hey! Why does everything look like crap in xterm?
Don't know haven't had this problem yet. Hint might be to try something of the above.
Short description of warnings and remedies when trying to compile CAMP:
warning: incompatible implicit declaration of built-in function ‘strcpy’
warning: incompatible implicit declaration of built-in function ‘strlen’
warning: incompatible implicit declaration of built-in function ‘strncat’
warning: incompatible implicit declaration of built-in function ‘strchr’
Add #include <string.h>to the top of the offending file.
warning: incompatible implicit declaration of built-in function ‘exit’
Add #include <stdlib.h> to the top of the offending file.
warning: incompatible implicit declaration of built-in function ‘printf’
Add #include <stdio.h>to the top of the offending file.
I've recently grown quite fond of my old Toshiba Satellite* that currently exists in the form of a digital picture frame. I'm still not sure what to do with it but I've started exploring the possibilities of removing xorg completely and focusing solely on a command line interface.
First thing is that I want to make it more robust, i.e. protect the CF-card from excessive disk writes and possible power failure. I could go with a dedicated dist such as Slitaz, Puppy or Tiny Core but I kind of like my own debian system. So I decided to go with reducing disk writes.
I've taken a few steps to reduce disk writes already. But then there is the never ending logging. So I took some of my precious RAM and put /var/log in it. I found some instructions on that here.
To accomplish this I added the following line in /etc/fstab tmpfs /var/logtmpfssize=4M,defaults,noatime,mode=075500
So far I'm only using 4 MB but I could probably lower this. I just need to keep it running for a while and see how logrotate works.
To prevent the 4 MB of log space to fill up uncontrollably I've configured logrotate from the default weekly rotation of logs to daily rotation and keeping only 1 day of backlog. I also added a size limit to each log file to 100k. But as far as "man logrotate" tells me this won't affect the logs more than once daily as the logrotate cron job only runs once each day.
As of now I've edited /etc/logrotate.conf accordingly.
# rotate log files daily
daily # keep 2 days worth of backlogs rotate 2
**PLEASE NOTE!
The above had little effect on my running system. Turns out many of the logs had separate instructions in:/etc/logrotate.d
Update them accordingly and you should be in business.
* Toshiba Satellite 320CDS CPU: 233 Mhz Pentium MMX RAM: 96 MB HDD: SandDisk Compact Flash 8 GB Extreme IV via Lycom CF 2 IDE Bridge OS: Debian Gnu/Linux Squeeze
For some reason I can't use PTT Twitter anymore so I started to look around for another console based twitter client. I found TTYtter. However I ran in to problems with the time being way off on my Digital Picture Frame. Probably because I haven't bothered to set it at all.
At first I programmed my ATmega328 chips by pulling them from my circuit and placing them in one of my original Arduino boards. Something that is fun once or twice but gets really annyoing when you do it alot. So working from this tutorial I added some female headers to the circuit, dug out my trusty old SparkFun FT232RL breakout board, a 0.1uF capacitor and some jumper cables.
New female headers added to the RST, RX, TX, +V and GND pins.
The circular thing in the upper left corner is a RF Transmitter module.
The Sparkfun FT232RL break out board.
I usually placed the FT232RL break out board on a breadboard hooked up jumper cables to the corresponding pins of the ATmega. Recently I built a quick n' dirty jig with headers to hold the break out board and permanently soldered jumper cables.
You can see more pictures and read about the build here
This saves me the use of a breadboard and the tedious task of having to flip the FT232RL over numerous times to check and double check the connections.
Issues:
avrdude: stk500_getsync(): not in sync: resp=0x1e
In Arduino IDE I used the board "Duemilanove w/ ATmega328" but kept getting the above error message. At this point I hadn't added the 0.1uF capacitor in series with the DTR pin on the FT232RL to the Reset pin on the ATmega328 so when I googled the error code and found this post it was the first thing I added. But things still wouldn't work. Until I changed my board to "Arduino Uno". After that everything worked like a charm.
Made a Quick n' dirty jig to fit my Sparkfun FT232RL break out board. I found it a tad bit annoying to always having to unplug and flip board to check and double check the connectors when uploading new code to stand alone ATmega projects.
Basically it brings out the VCC, GND, RXD, TXD and DTR (via a 0.1 uF cap) pins to jumper cables. I'll probably add some labels later.
One end of the jumper cables permanently soldered to the jig and the other end resting in the perfboard holes.
Under the board is the pretty simple circuit with the oh so important 0.1 uF capacitor that goes between the ATmega reset pin and the FT232RL DTR pin.
Ready and hooked up to a ATmega328P on a breadboard.
Finished Atari Punk Console in a Coleman's Mustard Powder can.
Declaration of contents on the back.
Obligatory video.
I based my circuit on these two schematics. Since I only had 555 chips and not a 556 I started with the first schematic but used the 1M Ohm pots from the last one and everything after the 10 uF capacitor. I guess I just liked the sound of the 1 M Ohm pots better. I also added a powerswitch and a LED to indicate ON/OFF.